

I promise you, focus is not as obvious as it seems. If you have issues with getting nice, clear images, you are not alone. I mean seriously, what's not to love about this picture from Estes Park?
Your camera most likely has auto-focus, one of the most wonderful inventions ever. Here is what it doesn't do automatically: read your mind about what is the most important thing in your picture! How would you know this? But you MUST know it if you want the results you are looking for. The great news is that you get to be in charge of what is most important, because the camera is just your servant waiting for you to tell it what to do!
So here is the secret. You either use an LCD screen or optical view finder that you hold up to your eye to frame (compose) your photo. Right now we are going to keep it simple. You may have many choices of focus points if you have an optical view finder. You may have a number of options in your menu for focus area if you are using an LCD screen. The default, and the easiest way to learn to focus, is to use the single center focus point. It usually shows up in the middle looking like a bracketed square [ ].
Whatever is in the middle of that square when you push the shutter button halfway down and hear that faint little "bzzzt"--as long as it doesn't move before you take the picture!--will be in focus in your picture. If it is five feet away from your lens, then everything five feet away will be in focus.
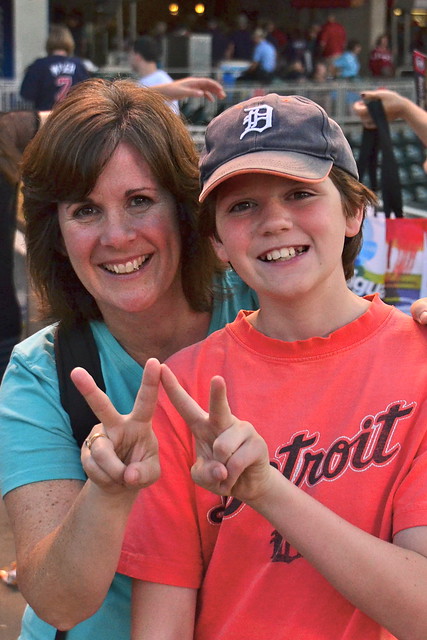
Ben and I were right smack in the middle of that picture, right?
Wrong. The red X is just above the middle. Look again.

The camera did a perfect job of following Lee's instructions. It focused beautifully on those plants on the rock wall behind us, and everything else that was the same distance away. The sign was closer to the focus point than Ben and I were, so it is clearer than we are. What I hadn't ever bothered to tell Lee was that if people are the subject of your photo, you have to lock the focus on their eyes. Here is what he needed to know:
1. Put that little bracket right over one of our eyes. Since we were the same distance from the camera, if he got one of us in focus, the other would be too.
2. Push the shutter button down halfway (until you hear that tiny little "bzzzt!") and keep it there to lock the focus on us.
3. Then if he wanted to, he could move the camera a little bit in any direction (with the focus still locked!) to include or exclude some of the background. In this case, that jewelry window does nothing for me, so I would have moved the camera to the right just enough to cut that out and include more of the rock wall.
4. When he had focused on us, and moved the frame to include exactly what he wanted in the picture, he should do two things to insure that focus by holding super still: squeeze his elbows in tightly to his sides, and hold his breath!
5. Click!
Look at this example of two photos that have nearly identical composition, or material in the frame of the photo.

Here I locked my focus on the tree trunk, probably the high contrast area left of center where light and dark meet. Then I moved my camera a bit to the right, held my breath, and pushed the shutter. Contrast is very helpful to your camera when you are trying to focus. Your auto-focus detects it instantly. If you are trying to focus on an area that is all similar in lightness or darkness, like a shadow, your camera may refuse to focus, or attempt to focus but keep readjusting. If it's a dark area you want as your focus, focus on the edge of it to catch some contrast.
In the photo above, the buds are bokeh, which, as we discussed last time, is just a ridiculously fancy word for blur. It's a word I would really never be caught saying out loud. The buds are a blur, is probably what I would say.

Here I locked the focus on the leaf buds in the foreground. I'm not even sure which bud, but I'm guessing one of those on the left twig because it was easy to isolate, meaning there was nothing nearby to confuse the camera over which thing I was trying to focus on. With the layers on the right, the camera might have vascillated back and forth between the back and front buds or twigs. Now the trunk is the bokeh. Or, the trunk is a blur. (Not to be confused with last week, which is also a bit of a blur, but definitely not bokeh. Last week is never bokeh.)
I'm coming back to aperture and depth of field next, very soon, actually. I think I can clarify some of what confused people last time. You do not have to shoot at f/1.8 to get bokeh. Until August, my widest aperture was f/3.6, and you can get lots of bokeh with that. Those tree shots above? f/6.3! Before that, I got bokeh with my point and shoot. I think maybe I can teach you a few tricks for getting more of it. Time will tell.
If you really want to come to class prepared, read this tutorial about depth of field ahead of time. And then, if you've never done so before, PRACTICE getting your focus exactly where you want it.
Lee is getting it figured out. You will too.
7 comments:
Or as I say to the stranger as I hand him my camera to take our family's picture, "Make sure that the dot that lights up on the screen is on us. Thanks." I love your tutorial. Keep 'em coming. I might learn how to use my camera yet.
One other way to get the bracket on your subject (in addition to moving the camera) is to move the bracket itself. Most cameras will allow you to move the bracket around to the different focus points (cameras vary in how many they have). So in this case, you could use the multi-selector wheel (usually used to navigate through menus) to move the bracket to an alternate focus point - down and to the right or left in this case. You can compose it the way you want first then move the bracket to your subject (or even do both at the same time).
Two other options that assist in focusing (that really aren't as complex as they sound) are AF lock and AF assist. AF lock (a separate button usually near the shutter button) will lock the focus (and/or exposure on most DSLRs) so that you can recompose (just as keeping the shutter half way pressed). AF assist can be used in poor light situation to illuminate a place long enough to get the focus locked on that spot. Both of these options are available on most DSLRs.
Great info, Tracy. Composition and focus really are the basic starting points!
Smart girl, Melissa!
Sandy, while I was looking for tutorials on focus, I discovered that AF lock secret. The tutorial I read did not explain it like you did, however! It's so much easer than it sounded--thank you!
What I failed to identify here is my audience--a reader or two who really want to get the most out of a non-DSLR camera. I would not really presume to write for a DSLR user, since I am well behind the majority! But if someone learns something, even better. I am learning in the process.
I have begun to use all of my focus points, but that REALLY messes things up if I want to hand off my camera to a different user. It may be that when Lee took this picture, I actually had the focus off to the right. I am rethinking that strategy!
You are doing a great job with your tutorials...keep up the good work!! Love reading them.
I totally know what you mean about the explanations about AF Lock. I avoided that option for the longest time because I just couldn't understand the directions (and more importantly, what it did and why). I knew how to use it on my D80 but still really haven't figured it out on my new camera.
Sorry for jumping in with info ~ don't want to confuse anyone or make anything more complex. I'm a firm believer in sharing knowledge and a fellow learner in the process. Keep up the good work!
I know what you mean about handing the camera off to someone else. I try to set everything before I hand it off and say "stand right here and point it straight ahead" and like your first commenter said "...make sure that red dot is on us" (or in my case, that red square). But that doesn't always work - I've noticed height can make a big difference (and there are A LOT of people taller than me!).
No problem at all Sandy--you are definitely helping ME, and others too I'm sure!
Excellent Tracy - I believe I understood that. :) blessings, marlene
Post a Comment